Its been just over another month of lockdown (with childcare!), so I figured it was time to list out last month’s little DIY achievements. I didn’t manage quite as many tasks as last month, but progress on little fiddly tasks that never seem to get done was made. The biggest achievement of course was growing our lawn (see last post), but we also managed to get a few other things ticked off the ‘To Do’ list.
I plastered in, sanded and painted over two small holes in our walls which had been annoying me since Christmas. (One hole was formed when the plaster chipped off when I’d temporarily installed a wreath, and the other was the result of our cloakroom door handle smashing into the wall.)
I finally found an install the perfect mirror for our under stair cloakroom. (The Arles mirror purchased here from Made)
I found a perfect rug for our master bedroom, inspired by the air bnb where we stayed at Christmas. In the end I decided that neither two side rugs, nor a massive area rug which ended up mostly under the bed was quite right. I’m really pleased with the softness and playfulness that this circular rug in its jaunty position adds. It was also a Made purchase, click here for the link and to see it featured in our bedroom! Made chose it to feature on their website of customer reviews!)
We swapped out the log base with bricks on our makeshift garden bench so it matches the bbq stand. Ive figured out the key to a unified garden design is repetition so having two elements made of this brick (in addition to our house), it helps the garden feel slightly less random and thrown together!
I also sanded and repainted the top of our study door where it had chipped and got damaged during the side extension works.
Fixed the pop-up waste plug on our sink
With lockdown easing, and Ada back at nursery, we might have a little more time to embark on some larger ‘mini’ projects.
So what did we do over lockdown? We grew a new lawn!
Our lawn got trashed when we built the side extension as it was the only place to store materials, and so we thought we’d have a go at re-seeding it ourself. The image on the top left is what we started with – compacted dirt and a few sad tufts of grass.
We spent the weekend of April 11th adjusting the straight run of rope stone borders in each side to add steps in them. The main reason for the stepped adjustment was to allow for the continuation of the line created by our new steps, but to step around a Euphorbia plant so it could be preserved. Liking how the step playfully broke up the ‘runway’ monotony of the side flower bed, we introduced another step on the other side further back where we were never able to get grass to grow directly under a dense shrub.
On the Easter weekend of April 20th we dug up and loosened the compacted soil, and in the process made a number of ‘archaeological’ discoveries. These included one full grumpy garden knome, numerous segments of other knomes, broken glass, plates, and a very rusted bicycle which had been broken into sections! That weekend we also scattered the grass seed.
After that we just waited and watched! We made a temporary bridge from the steps over the grass to the hole in the fence where our daughter communicates with our neighbour’s daughter, which somewhat remarkably (as she is just 2.5) she used. The grass took about 2 weeks to just start shooting up, and 5 weeks to be ready for its first haircut. Our first official mowing (with the tallest possible blade setting) was last weekend.
In a nutshell, if you don’t have the time to read the details below, Yes, plastic window film is worth it in my view. Adding a layer of plastic film made a huge difference to our internal thermal comfort, and saves energy, for just £8 (for proper draught exclusion film, don’t use kitchen cling film!) and half an hour of your time. Plus – no more condensation.
The single glazed window in our second bedroom never really bothered us much when it was a guest room as we were rarely in it, and in the evenings, the solid wood shutters we installed helped minimise hear loss in the winter.
However, now that we are stuck working from home, the room has become my architecture studio and it is not a pleasant experience to sit for 8 hours a day, every day, beside a cold draughty window.
I looked into heritage double glazing, as I didn’t want to loose the elegant Victorian character and slim mullions and frames, even at the back elevation. The Sash Window company does an accurate and beautiful reproduction of historic Victorian timber window, but with a double glazed pane. A number of people on our street have started to replace their front windows and they look amazing, but at approx £1200 – £1800 a window, (depending on size) they are cost prohibitive for us at the moment. Replacing with chunky framed, uPVC windows and loosing the Victorian character was also not an option!
So – what to do?
This article discusses how 25% of heat loss in a house is through draughts, and that methodically cutting down draughty is the most economical way to cut down your energy consumption and heating bill. In my old Georgian flat, we draught-proofed the windows with brush seals (check out Reddiseals), and it made a huge difference, not just to thermal comfort but also to the acoustics (they cut down on alot of street noise). But, long term we’d like to get replacement heritage windows, so didn’t want to pay for that expense and labour now.
So, we opted for plastic film. I know, I know, it sounds really cheap and nasty, (images of abandoned buildings and warehouses with bin bags taped to broken windows comes to mind!). However while it is cheap, (£8 for a pack which did two windows), it really isn’t as horrible as you would expect, for a good temporary solution, and they made a HUGE difference to interior thermal comfort levels. I figured I’d share this story with you as I’m sure there are loads of you out there shivering beside old windows working from home. It doesn’t need to be this way!!
But what about the view out I hear you say? Isn’t it blurry? The side by side image of the the full window shows the before on the left, and the after effect on the right. As you can see – the film is barely noticeable – no naff plastic bag effect! (Especially is behind curtains which would hide the edges). You trim excess edges with a blade after installation so it’s neat. The film is translucent so the view out isn’t as 100% crystal clear as glass, (there is a very slight ‘fog’) but it’s pretty minimal, especially if you compare it to a window fogged up with condensation.
The film is super easy to install – you don’t even need to be that skilled or precise. Here are my tips:
1. Make sure the window is 100% wiped clear of any condensation as you don’t want moisture trapped in between as it will then re-condense.
2. Wipe the frame clear of any dust so the double sided tape sticks
3. Apply the double sided tape to all four sides on a flat portion of the window frame (ie not on any beads or bevels or chamfered bits). Leave the backing on the top side of the tape in place.
4. Remove the backing to the tape on the top horizontal piece at the window head first
5. Stick the window film across the top, trimming the width to suit. Leave 3-5cm of excess to trim later.
6. Peel the backing off the tape on ONE side, and stick down the film, and then pull taught and stick to the other side, peeling off the tape then.
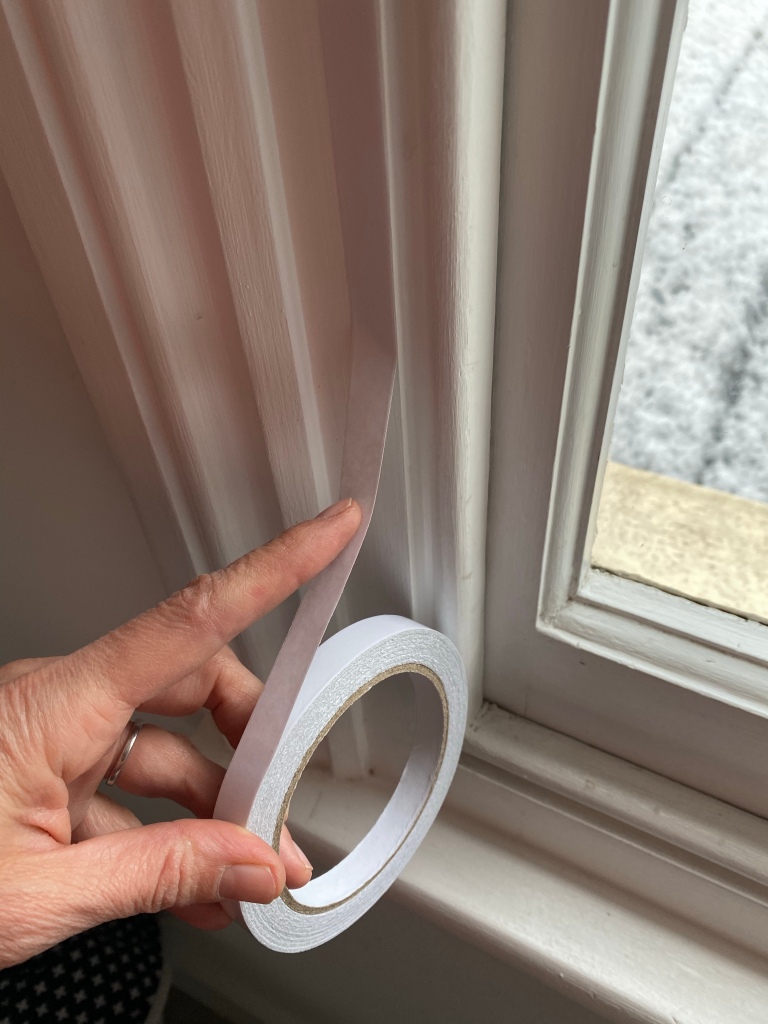
7. Lastly, remove the backing from the bottom horizontal tape band, and stick down the film at the bottom and trim. DO NOT WORRY if the film has bunched up, or is a bit wrinkly (see image). Miraculously, step 8 sorts everything out.
8. Using a hairdryer, blow hot air across the entire surface of the film. The film shrinks and goes taught. And you’re done!
The process took me about half an hour per window, and we did two.
Sure, this is plastic, which is a non renewable resource, but my understanding is that it can be recycled where you recycle any plastic carrier bags (typically at the grocery store), and there is definitely energy saved.
And yes, it’s a temporary solution for the winter months and it means you can no longer open your window. So keep that in mind! It’s best not to do this in a bathroom where you may want to ventilate the room after a hot shower to prevent mould growth.
I thought I’d share with you my top four black bar stool contenders… in case you are looking! All of these stools are available in a range of other colours and materials – but so you can compare them better, here they all are in black.
Muuto Nerd Stool (Stool with the grey background, available in a tempting pink, but it wasn’t the right tone for our kitchen)
Muuto Loft Stool (Stool with the tallest back support, and also available in oak with a lovely dusty green legs – but the oak wouldn’t match our ash cabinets, and there was already quite a lot of wood in the kitchen, and it was quite a heavy stool when I went to try it out)
Norman Copenhagen Form Stool with Steel legs (Stool with thinest metal legs – an elegant choice, but in the end I decided I wanted wood legs)
Norman Copenhagen Form Stool with Wood legs (Top right)
To get to Day 20, I went into my wardrobe to go through clothes I never wore, or that moths decided to partially eat for breakfast. I cleared out our fridge and pantry in our kitchen looking for old food tins and packets. I re-visited my home office to go through the pile of magazines I never seem to have time to read, and lastly ventured into the loft to review some of the massive bags of my daughter’s old clothes, toys and books that are accumulating. This is a huge task, and I confess I only made a small dent in it but we have to start somewhere, and every little bit helps! … and to those of you who are sentimental like me – fear not – all of the ‘special’ books, toys and outfits that still ‘spark joy’ (to use Marie Kondo’s approach) still sit in boxes in our loft waiting to have their fate determined in time.
So, in summary, over the last 10 days I got rid of:
11 items of my clothing
12 electrical items (including cables, USB sticks, and an old kettle – all of which we finally took to the electrical recycling box now available in our local B&Q)
13 children’s toys and baby books which Ada had grown out of
14 kitchen items including 10 expired food packets, tins, or jars from the fridge and pantry and 4 tote bags
15 instruction manuals (for items we no longer own!)
16 loyalty cards (from shops and cafes in central London not visited in the past year)
17 items from my home office including 7 CDs and 10 magazines
18 plastic bags (I always bring fabric totes to the supermarket, but still seem to accumulate plastic bags that come with online deliveries)
19 paper shop bags (Why was I holding onto these? Perhaps it was nostalgia for the days when we could shop in stores, and our purchases were presented to us wrapped in tissue paper and in nice bags!)
20 items of baby clothing
Day 20 is where I’m going to stop this year – that is two days further than I got in my Minimalist Challenge 2020, but one day less than I managed in 2018 so I’m going to count that as a success – with our house being 210 items lighter. I would have got further if I saved up all the bags I took to the charity shop after the various clear outs I did during ‘Lockdown 1.0’ in April last year…
Many of you followed me on my journey to build our kitchen side extension… and after that large project completed, my blog posts slowed as we needed a break from home improvements (both mentally and financially!) – plus I was busy launching my architectural practice – 4 S Architecture! However, once a home improvement enthusiast, always a home improvement enthusiast… and I’m itching to tackle a few more little home projects this year.
But, before I start on those, I thought I’d share with you not a before and after, but a ‘1 year after’. The image on the left was one of the last ‘completion’ images I posted for you of the project back in September 2019. I missed the exact ‘one year ago today’ post (it was Lockdown – time did weird things), but I thought you might be interested to see what our extension looks just over one year on. Its holding up well, and feels more ‘lived in’ and personalised now that we’ve finally got some prints framed and up on the wall.
A few finishing touches that we added over the course of the year include:
Moving the Muuto Varjo Rug that we purchased for our living room into the side area as tonally it worked with the pale pink plaster wall and plaster tinted floor. We bought the rug on sale as it was a showroom floor sample while on holiday in Margate back in 2019 (holidays… ahh… remember those?!). Our 2 year old daughter uses this space as a play area, and most of her toys are stored in the low wall unit you see in the bottom left of the image. With all the hard surfaces, we found that the rug really helps with acoustics!
The toy IKEA Duktig kitchen for our daughter matches the decor closely enough (it is made of birch plywood, where as our kitchen cabinetry wood is Ash), so sits neatly alongside our ‘real’ kitchen without looking too offensive.
After much debate, I finally decided on going with three black Muuto Visu stools. I knew I wanted wood stools, and some with a bit of an upturned ‘back’ to them for some support… but it took me some time to decide on the model and colour. In the end I felt with all the light wood, I needed some furniture with a bit of visual weight to it. Plus it matched the appliances.
We got a new ash wood table made… which you can see in the foreground… But I’ll share that story with you in a separate post
Finally getting around to hanging a mirror in the ‘Grand Hall’ (which you can just see through the door in the background) This isn’t the ‘final mirror’ – my plan is to have a much larger one there to bounce light into the space from the garden windows – but this one does the trick for now and gives you idea of the impact a much larger mirror will have.
…And so here we are already on day 10 of the minimalist challenge! Where did the first week of the year go?!
So where did I get to over the first ten days? I reviewed and sorted through the following areas:
The kitchen
The ‘charging station‘ in our hall. This is the area where we dump our keys, masks, and phones when we come back home from being out. It is here that 6 boxes tend to collect clutter over the course of the year.
My home office
My sock drawer
Our medicine cabinet to find old expired items.
In the first 10 days I managed to throw out or recycle:
I can’t believe January 1st has rolled around again – time does weird things during a lockdown without significant events to punctuate our diaries.
It has become my annual tradition to embark on the Minimalist Challenge, so I’m going to do it again this year, and as usual I’ll keep you updated of my progress as encouragement for those of you who like to follow along.
I’ll throw out, recycle or give away to charity one item today, two items on the second of January, three items on the third and so on through the month. Even small items like worn out pens count! I’m not sure how far I’ll get to as in “Lockdown 1.0” I used the opportunity to clear out a number of cupboards and drawers – but I do believe it’s a great exercise to start the year with to keep on top of clutter accumulation.
When things start to get more tricky (usually around January 8th), I’ll attack my sock drawer (where I seem to have collected an inordinate number of unpaired socks), and move onto the medicine cabinet where there will no doubt be expired items we should get rid of.
I seem to have welcomed more plants into our home over the past year, so to accompany my posts I’ll include photos of them along the way.
This pretty little one is a Watermelon Vine or Dischidia Ovata.
It was always part of the design plan for a projector to be installed above the coffee station high cabinets in our extension so that we could project the occasional movie, or holiday slide show onto the opposite wall. We didn’t however purchase the projector as at the time as it fell into the ‘deferred luxury purchases’ column because it would likely only be used occasionally.
With lockdown forcing us to spend so much time in our homes, Alex decided that we should probably bring forward that purchase as it would make our lives at home better. (Thank you Alex!) Its a bit bright in the day next to our massive picture window, but Ada and I watch a session of Cosmic Kids toddler Yoga on it every weekday morning, and its brilliant.
There are many, many guides on the internet about what lumen brightness is required, depending on whether you want cinema quality in a designated home cinema room, or one just for occasional viewing. You also need to consider the distance of the projector from the screen, and your desired image size… I won’t go into the details here – but if you are considering a projector – do some research first!


